Self Web Hosting : Managing your internet profile can be achieved through self-hosted websites. Your website can be managed and customised to meet your needs. Your digital domain is now yours to own.
For your server, you have a choice of hardware and software. A virtual private server (VPS) or a dedicated server. You now have total control over the resources that have been allocated to your website.
The ability to build several websites on a single server is a benefit of self-hosted web hosting. There is no requirement for a third-party supplier or additional costs. Every website can be tailored to meet the specific requirements of each one.
When technology developed and made hosting services more widely available, self-hosted websites became popular. People looked at hosting their own websites. They gained control as a result.
Understanding Self Web Hosting

The idea of self-hosted websites is fantastic. It gives users authority over their online persona. You have complete liberty and freedom when you host your website on your own server. Your virtual domain is in your control!
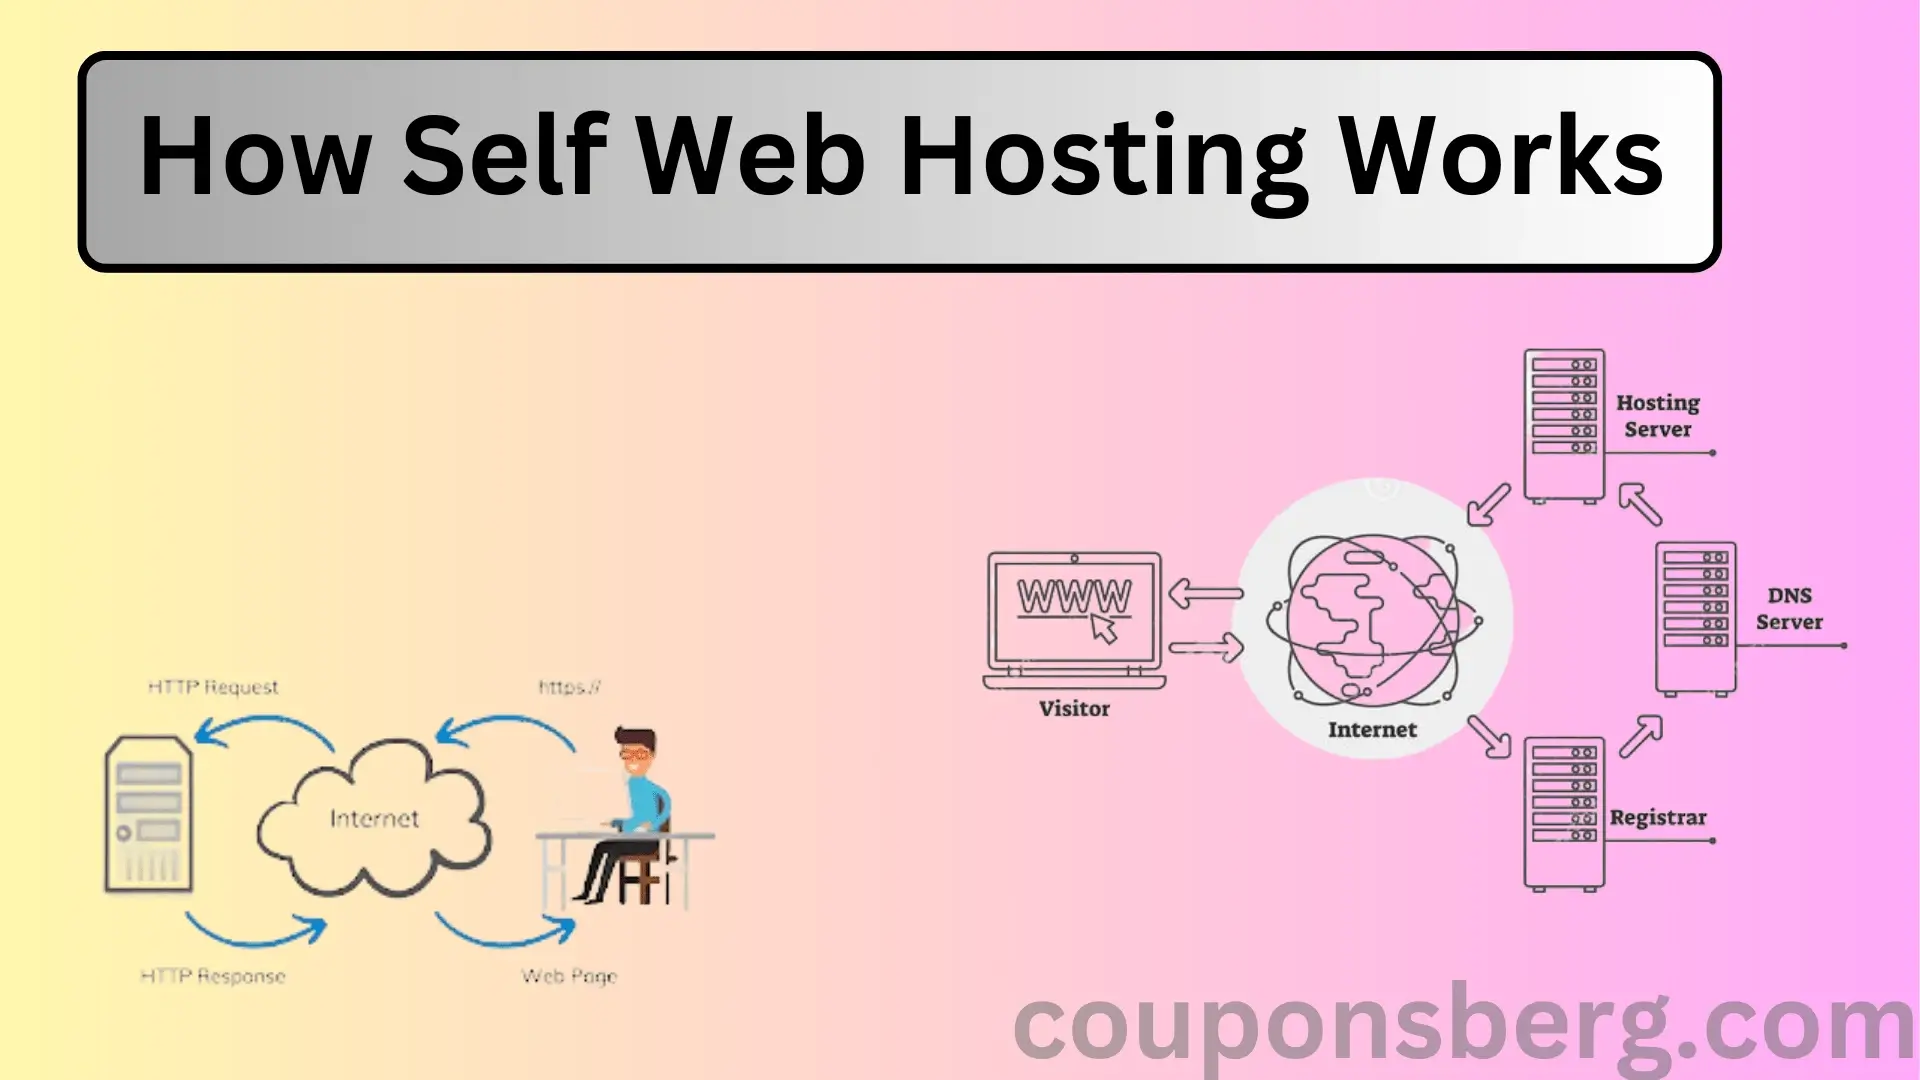
Know the fundamentals of self-hosted websites. In contrast to conventional web hosting, you are not dependent on an outside service provider. You hold the power when you host your own website. For complete control over your website, you configure and oversee your own server.
Use self web hosting to give your website a unique look. Select the software and hardware setups that work best for you. Direct control over server access and data management results in optimal performance and improved security.
Did you know that CERN and NASA both use self-hosted websites? They control their own infrastructure and servers. This demonstrates the dependability and adaptability of self-hosted websites.
Benefits of Self Web Hosting

Self-hosted websites provide several benefits for both people and companies. The primary three are as follows:
- Control: You are in complete command of your website. You can change the features and style to create a distinctive online presence that aligns with your goals and brand.
- Savings: You can cut expenses by not using outside hosting services when you use self-hosted websites.
- Scalability: You can increase server capacity and manage increased traffic without depending on outside suppliers.
Additionally, self-hosted websites have advantages not mentioned here. Sensitive data can be safeguarded by utilising sophisticated security methods.
Try these suggestions to get the most out of your self-hosted website:
- Frequent Backups: To prevent data loss or corruption, automatically create backups of the databases and files on your website.
- Performance Optimisation: To reduce loading times, utilise CDNs, cache, and compress files.
- Continuous Maintenance: Update plugins and CMSs on a regular basis. This reduces vulnerabilities and guarantees seamless operation.
These tips will help you build a self-hosted website that is safe, dependable, and quick enough to fulfil your demands.
Steps to Set Up Self Web Hosting

Choose a domain name, pick a hosting company, set up DNS settings, install website software, and upload website files to have your website set up for self-hosted web hosting. This section will cover each of its subsections in order to give you a clear option for setting up your own self-hosted website.
Choosing a Domain Name
Choosing a domain name is an essential first step in creating an online presence. This moniker will serve as your website’s unique identification and brand ambassador. Consider the following before choosing your domain name:
Verify if it pertains to the information on your website or business. It must to convey to visitors what to anticipate from your website right away.
Make it brief and simple to remember. Long and complicated domain names can be challenging to enter accurately and can be confusing.
Avoid using hyphens or digits. They could make it appear amateurish and difficult to recall.
Include keywords in the name of the domain. This can improve SEO and make it easier for prospective customers to find you.
Prior to choosing, it’s also critical to investigate the availability of several domain names. You may check if a domain name is taken or if there are variations using a variety of web tools. Select the option that most closely aligns with your goals and brand after you’ve narrowed down your alternatives.
Selecting a Hosting Provider

You need to be careful while selecting a web hosting company for your website. Some things to think about are:
Dependability: Select a provider that ensures a high uptime and little downtime so that your website is constantly accessible.
Scalability: Choose a service provider that makes it simple to scale up or down and change plans as your website expands.
Customer care: If you have any problems or need assistance, choose a host that offers dependable and prompt customer care.
Security is essential for websites. Select a provider that offers encryption, firewalls, and frequent backups to safeguard data.
Additionally, keep an eye out for special features like user-friendly control panels, limitless bandwidth, or free SSL certificates. These can enhance the worth of your bundle.
Make a wise choice and ensure that your project or business has a great internet presence.
Configuring DNS Settings
Setting up DNS? It is necessary for self-hosted websites. Link domain to IP address of web server.
- 1. Log in to the website of the domain registrar. Navigate to the DNS management area.
- 2. Locate the domain’s A Record and change it to point to the IP address of the server.
- 3. If your subdomains point to the domain name, create CNAME records for them.
- 4. Remember to save your modifications. Give DNS propagation some time.
Additionally, make sure you enter the IP address precisely and adhere to the hosting provider’s instructions.
Pro Tip: Lower the TTL value before altering DNS records to minimise downtime. This will facilitate quicker DNS record updates.
Installing Website Software

Select the appropriate web page software, such as Joomla or WordPress. Store it on your device after downloading it from the official websites.
Next, locate the “File Manager” option in your web hosting account. Navigate to the root directory of your website by using the “File Manager.” To add the downloaded software to the directory, use the file upload.
Following these instructions will ensure that the website software has been successfully deployed on your web hosting platform.
Additionally, see if there are any system requirements for the software you’re installing. By doing this, you can ensure that your website will function flawlessly and prevent any compatibility issues.
Now that you are proficient in installing website software, go ahead and establish a credible online identity. Don’t pass up the opportunity to use self-web hosting to showcase your artwork or to market your company.
Uploading Website Files
Uploading files is essential when it comes to self-hosted websites! Take the following actions to ensure that your website is accessible via the internet:
- Make sure your web server is connected. For this, use FileZilla or another FTP client programme.
- Enter the login credentials that your hosting provider sent you. This contains the password, username, and FTP hostname.
- Find the www or public_html folder. You must upload the files for your website here.
Choose files, then upload them. Use the FTP client’s drag and drop or file transfer buttons to accomplish this. - Observe the developments closely. Please be patient as large files take longer to upload.
- Examine the server’s directory. To accomplish this, open the URL of your website in a browser and check to see if it displays.
- Make sure you have a strong internet connection, arrange your files appropriately, verify the rights on your files, and set up your database connections for a successful experience.
A crucial component of self-hosted websites is the uploading of website files. Get your website up and going right now to avoid missing out!
Managing Self Web Hosting
You must become an expert in managing server maintenance, tracking down common problems, and keeping an eye on website performance if you want to run your own web hosting business effectively. These crucial subsections give you the answers you need to maintain the seamless operation and best possible functioning of your website.
Monitoring Website Performance
For self-hosted websites, monitoring website performance is essential. Monitor your website’s performance, speed, and availability. Track performance to identify problems and address them. Take action to improve user experience.
- To ensure the best speed, check the page load time.
- Always keep an eye on the server’s uptime to ensure accessibility.
- Monitor website traffic to learn about user behaviour.
- To find delays, examine the response time of the server.
- Verify the seamless operation of third-party connectors.
- Configure notifications and alerts for any problems with performance.
Strong tools like Pingdom and Google Analytics can assist you in keeping an eye on the functionality of your website. These offer in-depth analysis and performance data.
Monitoring the functioning of websites is more crucial than ever in the current digital era. Websites that load slowly or are untrustworthy risk losing visitors and harming their reputation. Track website efficiency to maintain proactivity and guarantee a positive customer experience.
Handling Server Maintenance

Taking care of server maintenance is part of managing your own web hosting. Here’s how to do it correctly in four steps:
1. Continually check in on your server. It’s important to monitor disc space, RAM, and CPU utilisation. This will assist you in identifying possible problems before they worsen.
2. Update your software. Updates for software typically include security patches and bug fixes. The stability and security of the server will increase as a result.
3. Make backups. Use cloud storage services or safe off-site storage to keep them. This guards against unintentional deletions and hardware malfunctions.
4. Put security measures into action. It’s crucial to have safe protocols, firewall rules, strong passwords, and software upgrades with security patches.
Additionally, consider elements like network connectivity, physical security, and redundant power supplies. I once encountered incompatibility problems with a software update. Customers were irate and revenue was lost as a result. I learned how important it is to conduct extensive testing and to have backup plans.
Use these procedures and take proactive measures to resolve any possible problems in order to manage server maintenance efficiently. This will optimise security and reduce disturbances.
Troubleshooting Common Issues
Verify the stability of your internet connection. If there are any caching problems, clear the browser’s cache. Verify that DNS settings are correct to prevent issues with connectivity. Update the plugins and software frequently. To reduce loading times, optimise files and images. Keep an eye on your website frequently. File permission problems might occur to novices; make sure to fix them.
| Load time | Visitor retention |
|---|---|
| Less than 3 seconds | Higher chance |
Websites that load in fewer than three seconds are more likely to retain visitors, according to HubSpot study.
GER MORE INFORMATION VISIT ON…………...Couponsberg.com
FAQs : Self Web Hosting
1. What is self web hosting?
Answer: Self web hosting means hosting your website on your own server rather than using a third-party hosting service. This gives you full control over your server’s configuration, security, and resource allocation.
2. What are the benefits of self web hosting?
Answer: Benefits include complete control over server settings and environment, potentially lower long-term costs, enhanced security and privacy, and the ability to customize and optimize performance based on your specific needs.
3. What hardware and software do I need for self-hosting?
Answer: You need a dedicated server or a powerful computer, a stable internet connection, and server software like Apache, Nginx, or IIS. Additionally, you’ll need a domain name and software for managing databases, like MySQL or PostgreSQL, and possibly a content management system (CMS) like WordPress.
4. Is self web hosting secure?
Answer: Self web hosting can be secure if you implement proper security measures such as regular software updates, strong passwords, firewalls, SSL certificates, and routine backups. However, it requires consistent maintenance and monitoring.
5. How do I set up a self-hosted website?
Answer: Steps include:
-
-
-
- Acquire and set up the server hardware.
- Install an operating system (Linux distributions like Ubuntu are popular for web servers).
- Install web server software (Apache, Nginx, etc.).
- Configure your domain name to point to your server’s IP address.
- Set up databases and any necessary server-side scripts.
- Upload your website files to the server.
- Test and ensure everything is running correctly.
-
-
6.What are the costs associated with self web hosting?
Answer: Costs can include hardware (server or computer), software licenses if needed, a domain name, electricity, and potentially a higher-tier internet plan. While initial costs may be high, recurring costs might be lower compared to paying for hosting services.
7. Can I host multiple websites on one server?
Answer: Yes, you can host multiple websites on a single server using virtual hosts (Apache) or server blocks (Nginx). Each website can have its own configuration and domain, managed from the same physical server.